Robot vacuum cleaners need tire replacements?
Last week I noticed that Rosie, our iRobot Roomba S9 vacuum cleaner robot, was getting stuck in a few places that she never used to, mainly when she needed to climb over a bump of some sort like an anti-trip cable conduit. When I flipped her over it was clear that her tires had worn down as they were practically smooth with just a faint outline of where tire tread used to be. A quick double check of a photo of a new S9 on the Internet showed that they ship with chunky treads so I would need to find replacements.
It turns out iRobot do not sell tires, although it is possible to buy an entire wheel module which includes the motor, suspension, wheel and tire for $35 each side. $70 was more than I would like to pay however so I tracked down a pair of tires for $12 on Amazon which claimed to be compatible with all Roombas.
When they arrived the box had a couple of steps where they described removing the bottom cover from the Roomba, removing three screws to release the wheel module and then simply pull the old tire off and ease on the new one. Sadly, while those instructions may work on cheaper or older Roombas, they are not correct for the S9. A Google and YouTube search for replacing S9 tires was not forthcoming either...
So there are three basic problems with the instructions:
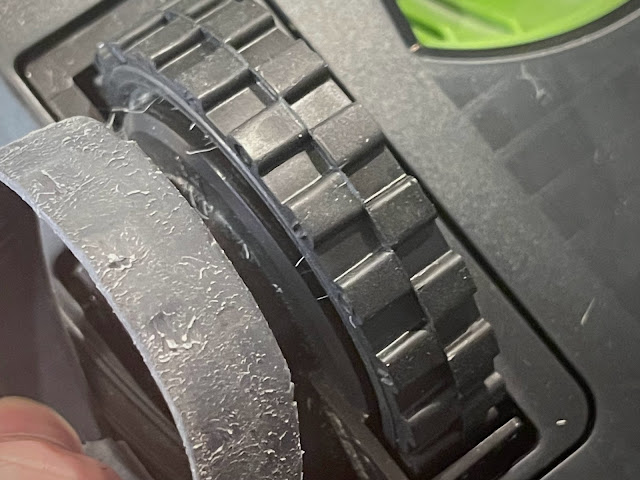
1) There are no screws holding in the wheel module, you just pull them out after removing the base cover.
2) You can't easily pull the old tire off, you effectively have to cut it and then pull it off as it seems to be stuck on with some kind of adhesive and part of the tire material goes down inside the wheel.
3) Putting the tire onto the wheel is not easy either as the wheel module surrounds the wheel blocking you from slipping the tire over. The solution is to open a small screw which holds on a plastic plate over the motor and unhook the suspension spring from it. You can then carefully extend the wheel further away from the module by slightly bending it under a stopper, and then you can slip the tire over it, first pushing it through one section which has a tight gap before pushing it over the rest of the wheel which is exposed. Push the wheel back to its original position, hook the spring back on the plastic plate and screw it back down before placing the module back in the robot. If the spring becomes unhooked at the other end you need to hook it back on before securing it at the motor end.
The process is fiddly and time consuming and took me around 40 minutes and involved needle nose pliars and side cutters in addition to the two screwdrivers.
On the plus side the Roomba worked perfectly after I re-assembled it so I hadn't broken anything and sending it to clean an area that it got stuck in the last two attempts was no problem this time.
I don't know how long these aftermarket tires will last, the first set cleaned 309,000 sqft and if that figure includes the 14 months or so before I reset the system then assuming 309,000 sqft being a strip 1 sqft wide that's 309,000 feet or nearly 60 miles. The distance traveled to get to various rooms isn't counted so I'd guess Rosie has probably traveled closer to 65 miles maybe.
Quite impressive when you think about it...


Comments
Post a Comment